- Product Details
- {{item.text}}
Quick Details
-
Model Number:
-
BRT-404
-
Max. Current:
-
9.10 A
-
load type:
-
school and barrack' bells or household curtain motors
-
load rating:
-
2000W
-
timer settings:
-
20 (accurate)
-
LCD display:
-
current time and the latest on/off time
-
weight:
-
141g
-
size:
-
86*86mm
-
preset:
-
preset
-
color:
-
white
-
name:
-
electric timer switch
-
Certification:
-
/
Quick Details
-
Max. Voltage:
-
240 A
-
Place of Origin:
-
Guangdong, China
-
Brand Name:
-
iPuray
-
Model Number:
-
BRT-404
-
Max. Current:
-
9.10 A
-
load type:
-
school and barrack' bells or household curtain motors
-
load rating:
-
2000W
-
timer settings:
-
20 (accurate)
-
LCD display:
-
current time and the latest on/off time
-
weight:
-
141g
-
size:
-
86*86mm
-
preset:
-
preset
-
color:
-
white
-
name:
-
electric timer switch
-
Certification:
-
/
Features:
BRT-404 and BRT-404B are the most advanced timer switches. They are controlled by a micro controller unit
and have very accurate timing capability. They are designed for easy installation and retrofit, directly fit into
standard wall box where both hot wire and neutral wire are present.
BRT-404 has accurate timing setting to a second, while BRT-404B has accurate timing setting to a minute.
l Up to 20 timing periods available each day, and memory function and password protection for the settings;
l LCD display showing current time, timing period #, next On time and current day;
l Manual control or automatic control available. User friendly front panel key pads for easy manual operation
or automatic timing settings;
l Load up to 2000W;
l ABS-V0 flame resistance material; and
l
Classical 86 series design and high quality build.


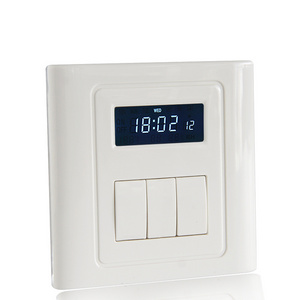
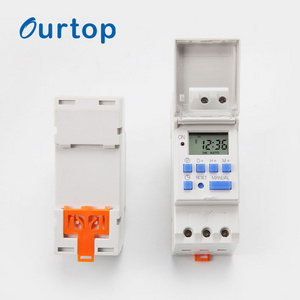
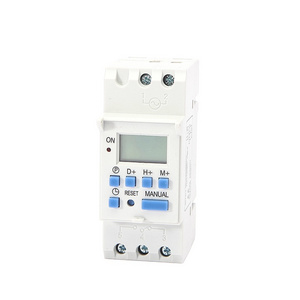
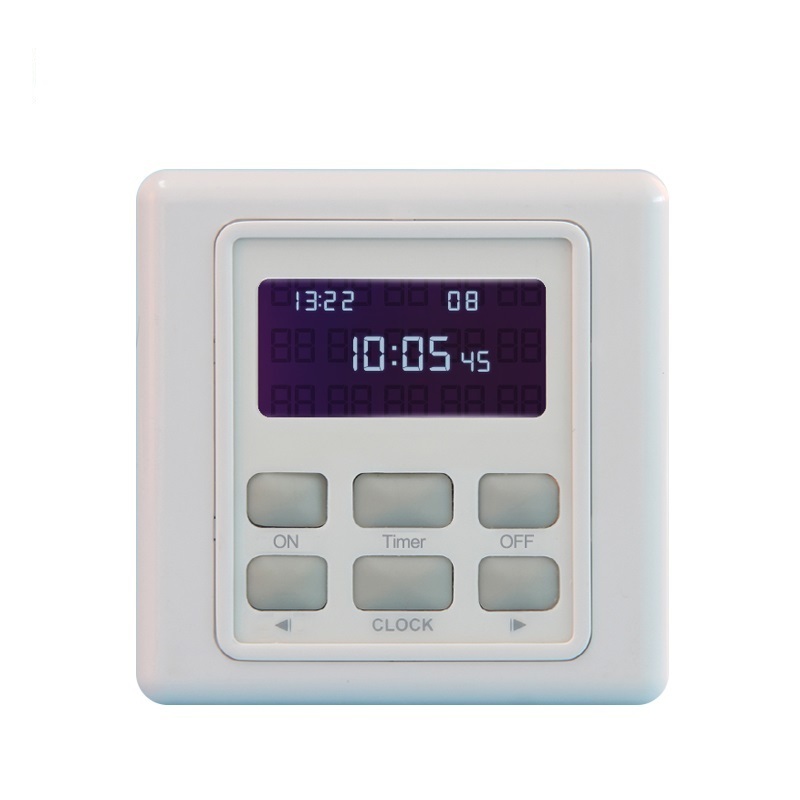
LCD Display and Front Panel Buttons:
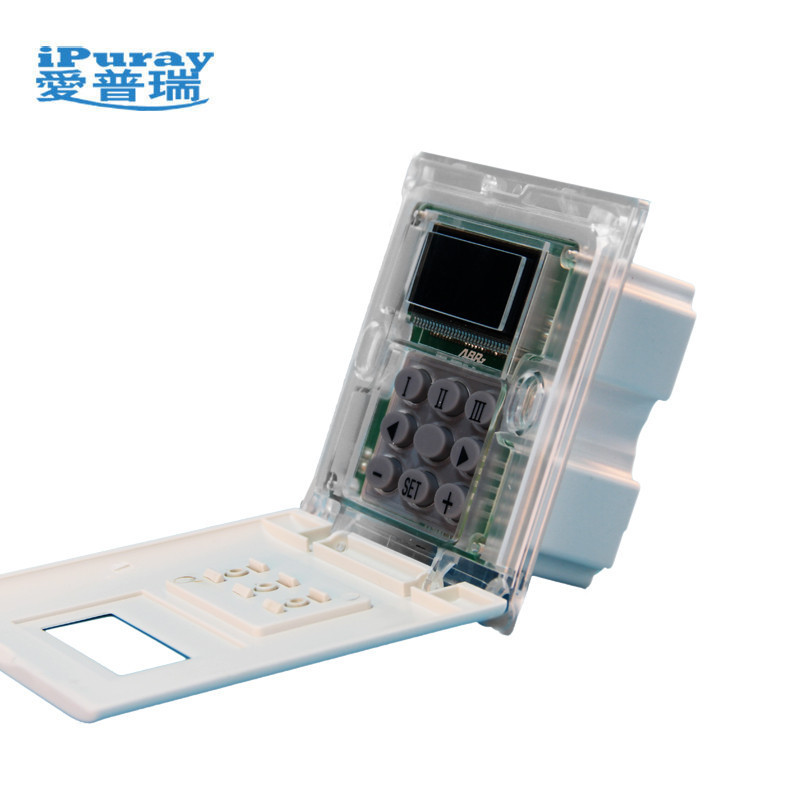
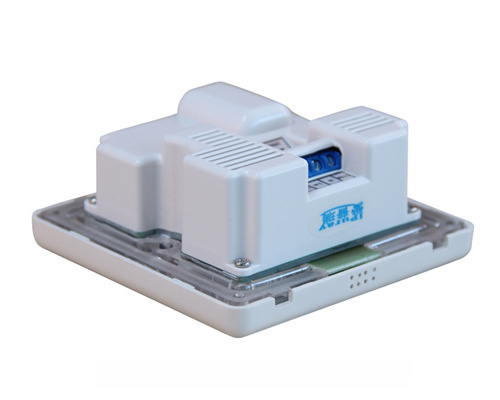
Fig. 1 and 2 show front view and back view of the BRT-404 and BRT-404B timer switches respectively.
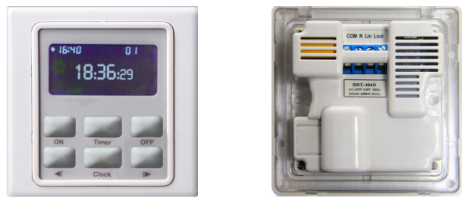
Fig. 1 Front View Fig. 2 Back View
As shown in Fig. 3, the BRT-404 and BRT-404B timer switches have an LCD display and 6 buttons in the front.
The LCD display shows clock time, timing period #, timer On time for the current timing period, and current day
of the week.

Fig.3 Front Control Panel and LCD Display
The 6 buttons are used to turn on/off the load, and set clock time and timing settings.
ON: Power on the load. It can override the timer’s automatic control; and
In timer setup mode, pressing button will change the day setting or go to the previous timing period.
OFF: Power off the load. It can override the timer’s automatic control; and
In timer setup mode, pressing button will change the day setting or go to the next timing period.
Clock: Press the button to enter clock setup mode, or password setup mode.
Timer: Press the button to enter timer setup mode.
: Press button to decrease the time, when the clock setting mode or the timer setting mode is selected
and the digits are flashing; or
When the clock digits are not flashing, pressing and holding the button for 3 seconds will go to the
previous timing period or press and hold the button for 5 seconds will check previous timing setting.
: Press button to increase the time, when the clock setting mode or the timer setting mode is selected
and the digits are flashing; or
When the clock digits are not flashing, pressing and holding the button for 3 seconds will go to the
next timing period or press and hold the button for 5 seconds will check the next timing setting.
Specification Parameters:
|
Input Voltage |
220~240V(50Hz/60Hz) |
Operation Environment |
No-condensation 20-90% RH,-20℃~55℃ |
|
Wattage |
2000W |
Load type |
All Types |
|
Mounting Hole
|
60mm |
Matching
|
75mm x 75mm x 50mm |
|
Dimension |
86mm x 86mm x 50.5mm |
Weight |
141g |
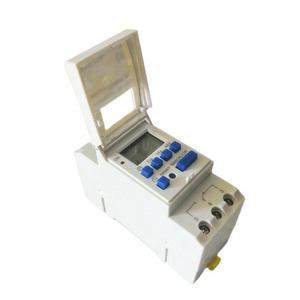
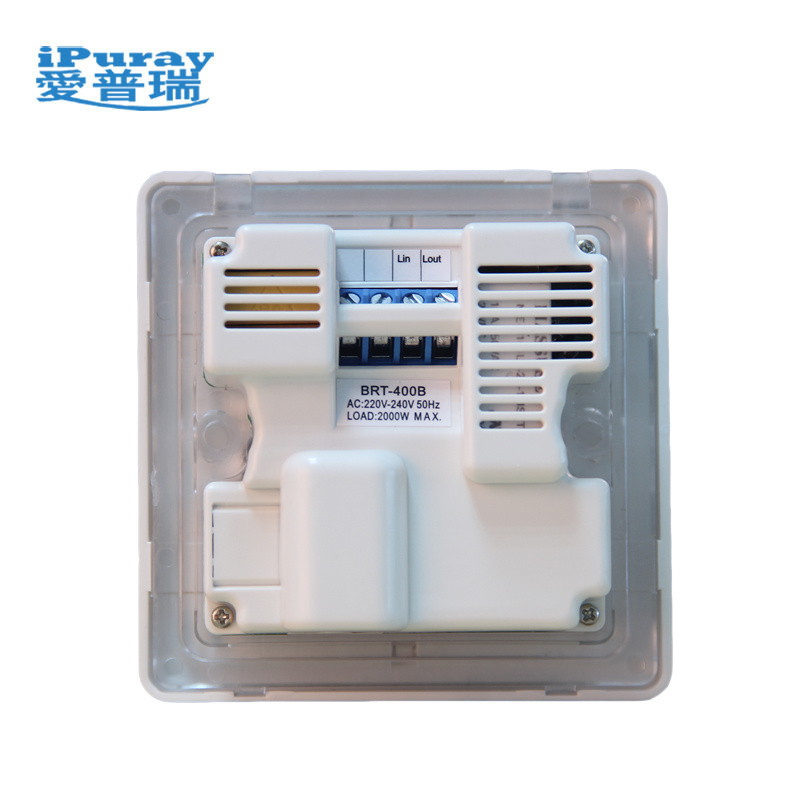
Wiring Diagram and Installation Guide:
BRT-404 timer switch and BRT-404B timer switch require both the hot wire and the neutral wire for installation:
Hot wire (ACL): Coming from the power line with 220V;
Neutral wire (ACN): Usually coming with the hot wire; and
Loads wire: Going to the load.
Fig. 4 BRT-404/404B wiring diagram
Warning: Please make sure power is turned off before starting installation!
Fig. 4 shows wiring diagram and Fig. 5 shows step-by-step installation instructions. There are three easy steps:
Step one: Use a screwdriver to pry off the front plate in position A;
Step two: Wiring according to the diagram and the labelled ports of the switch; and
Step three: Install screws and front plate.
Fig. 5 BRT-404/404B installation guide
BRT-404 Timer Switch Setup:
1. Set up the clock:
1.1 Press the "Clock" button and hold for 3 seconds to enter the clock setup mode, the hour display starts
to flash; press "Left" or "Right" to adjust the hours (holding down "Left " or "Right " will adjust the
hours quickly);
1.2 Press the "Clock" button again, the minute display starts to flash; press "Left " or "Right " to adjust the
minutes (holding down "Left " or "Right " will adjust the minutes quickly);
1.3 Press the "Clock" button again, the day display starts to flash; press "Left " or "Right " to adjust the day
of the week (1=Monday, 2=Tuesday, etc.); and
1.4 Press and hold the "Clock" button until clock display stops flashing. The clock settings are saved.
(Note: If there is no button operation for 15 seconds, the clock settings will be automatically saved).
2. Set up timer On time and duration:
Timer On time:
2.1 Press and hold "Timer" button for 3 seconds to enter timer setup mode, the display will show “--:-- op”
(timer start time) ;
2.2 Press and hold “On” or “Off” button to change the day (1=Monday, 2=Tuesday, etc.);
2.3 Press and hold "Timer" button for 3 seconds to enter timer setup mode, the display will show “--:-- op”
(timer start time) ;
2.4 When the display hour is flashing, press "Left " and "Right " to adjust the hours, (holding down "Left " or
"Right " will adjust the hours quickly);
2.5 Press the "Timer" button again, the minute display starts to flash; press "Left " or "Right " to adjust the
minutes (holding down "Left " or "Right " will adjust the minutes quickly);
Once the Auto On time is set up, proceed to set up the timer On duration (delay time):
2.6 Press the "Timer" button again, the display will show “--:-- du” (timer On duration);
2.7 When the display minute is flashing, press "Left " and "Right " to adjust the minutes, (holding down "Left "
or "Right " will adjust the minutes quickly);
2.8 Press the "Timer" button again, the second display starts to flash; press "Left " or "Right " to adjust the
seconds (holding down "Left " or "Right " will adjust the seconds quickly);
Once timer on time and duration are setup, there are three options:
Press “Off” button to start setting up the next timer On time and duration, or
Press “On” button to go back to modify the previous timer On time and duration, or
Press and hold the "Timer" button until clock display stops flashing. The timer settings are saved.
(Note: If there is no button operation for 15 seconds, the timer settings will be automatically saved).
The longest duration for BRT-404 is 90 minutes. If a longer timer On period is needed, please use overlapping
timer periods, i.e., the next timing period starts before the last timing period is finished.
3. Delete timer settings
Press the “Timer” button and hold for 3 seconds to enter into the timer setup mode. Press “ON” or “OFF” until
the timing period to be deleted displays. Then, press "Left " or "Right " to set the time on time to “--:--op” and set
the timer duration to “--:--du”. The timing period is deleted.
4. Password settings
4.1 Set Password: Press and hold the "Clock" button 3 seconds until the hour position flashes, then press
"Clock" button five times to have the display show --:--P1. Press "Left " or "Right " to set the password
Press "Clock" button again to have display show --:--P2. Press "Left " or "Right " to set the password
identical to P1 to confirm the password. Press and hold the "Clock" button for 3 seconds to save the
password. The password will come into affect after 180s.
4.2 After setting the password, pressing any button will have the display shown --:--PR. Press "Left " or
"Right " to enter the right password, and then press the "Clock" button to enter the operation mode.
4.3 Delete the password: Press and hold the "Clock" button 3 seconds until the hour position flashes, then
press the "Clock" button five times to have the display show P1. Press "Left " or "Right " to adjust the
password setting back to --:--P1. Press the "Clock" button again to have the display show P2, then Press
"Left " or "Right " to adjust the password setting back to --:--P2. Press and hold the "Clock" button for 3
seconds to save the setting. The password has been deleted.
4.4 In case the password is forgotten, please talk to our sales representatives.
BRT-404B Timer Switch Setup:
1. Set up the clock:
1.1 Press the "Clock" button and hold for 3 seconds to enter the clock setup mode, the hour display starts to
flash; press "Left "or"Right " to adjust the hours (holding down "Left " or "Right " will adjust hours quickly);
1.2 Press "Clock" button again, the minute display starts to flash; press "Left " or "Right " to adjust the minutes
(holding down "Left " or "Right " will adjust the minutes quickly);
1.3 Press the "Clock" button again, the day display starts to flash; press "Left " or "Right " to adjust the day of
the week (1=Monday, 2=Tuesday, etc.); and
1.4 Press and hold the "Clock" button until clock display stops flashing. The clock settings are saved.
(Note: If there is no button operation for 15 seconds, the clock settings will be automatically saved).
2. Set up timer On time and timer Off time:
Timer On time:
2.1 Press and hold the "Timer" button for 3 seconds to enter timer setup mode, the display will show “--:--
op” (timer start time) ;
2.2 Press and hold “On” or “Off” button to change the day (1=Monday, 2=Tuesday, etc.);
2.3 Press and hold the "Timer" button for 3 seconds to enter timer setup mode, the display will show “--:--
op” (timer start time) ;
2.4 When the display hour flashing, press "Left " and "Right " to adjust the hours, (holding down "Left " or
"Right " will adjust the hours quickly);
2.5 Press the “Timer” button again, the minute display starts to flash; press "Left " or "Right " to adjust the
minutes (holding down "Left " or "Right " will adjust the minutes quickly);
Once the Auto On time is set up, proceed to set up the timer Off time:
2.6 Press the "Timer" button again, the display will show “--:-- cl” (timer Off time);
2.7 When the display hour flashing, press "Left " or "Right " to adjust the hours, (holding down "Left " or
"Right " will adjust the hours quickly);
2.8 Press the "Timer" button again, the minute display starts to flash; press "Left " or "Right " to adjust the
minutes (holding down "Left " or "Right " will adjust the minutes quickly);
Once timer On time and timer Off time are setup, there are three options:
Press “Off” button to start setting up the next timer On time and timer off time, or
Press “On” button to go back to modify the previous timer On time and timer off time, or
Press and hold the "Timer" button until clock display stops flashing. The timer settings are saved.
(Note: If there is no button operation for 15 seconds, the timer settings will be automatically saved).
3. Delete timer settings
Press the “Timer” button and hold for 3 seconds to enter into the timer setup mode. Press “ON” or “OFF”
until the time period to be deleted displays. Then, press "Left " or "Right " to set the time on time to “--:--op”
and set the timer off time to “--:--cl”. The timer period will be deleted.
Applications:
BRT-404 timer switch and BRT-404B timer switch are used for automatically turning on and/or turning off
various loads such as fans, lights, appliances, or other kinds of electrical equipment. They are perfect for saving
energy and bringing convenience and safety to our daily life and work.
They have wide applications at various locations such as homes, schools, laboratories, hospitals, offices, etc.
The typical application scenes include:
Schools: Automatically ring the bells according to a fixed timetable to relieve manual intervention.
Hospitals or Laboratories: Automatically turn on and turn off UV disinfection equipment to isolate operators
from harmful UV exposure.
Farms: Automatically turn on or turn off breeding equipment or lighting equipment for animals.