- Product Details
- {{item.text}}
Quick Details
-
No-Load Speed:
-
13000opm
-
Sand Pad Size:
-
90x187mm
-
Place of Origin:
-
Jiangsu, China
-
Brand Name:
-
FIRST RATE sheet sanders
-
Model Number:
-
FS260 sheet sanders
-
Frequency:
-
50HZ/60HZ
-
Application:
-
paints/wood/metal
-
Weight:
-
2.10kg
-
Product name:
-
260W electric sheet sanders straight line sanders
-
Tool length:
-
33x18x13cm
-
Color:
-
Customized
-
Input power:
-
260W
-
Rated voltage:
-
230V/120V
-
Sanding movements:
-
13000opm
-
Packing:
-
Color box/Nylon bag
-
Package size:
-
67.5x38.5x34.5cm/10pcs
-
OEM:
-
Welcomed
Quick Details
-
Variable Speed:
-
NO
-
Rated Voltage:
-
230V/120V
-
Rated Input Power:
-
260W
-
No-Load Speed:
-
13000opm
-
Sand Pad Size:
-
90x187mm
-
Place of Origin:
-
Jiangsu, China
-
Brand Name:
-
FIRST RATE sheet sanders
-
Model Number:
-
FS260 sheet sanders
-
Frequency:
-
50HZ/60HZ
-
Application:
-
paints/wood/metal
-
Weight:
-
2.10kg
-
Product name:
-
260W electric sheet sanders straight line sanders
-
Tool length:
-
33x18x13cm
-
Color:
-
Customized
-
Input power:
-
260W
-
Rated voltage:
-
230V/120V
-
Sanding movements:
-
13000opm
-
Packing:
-
Color box/Nylon bag
-
Package size:
-
67.5x38.5x34.5cm/10pcs
-
OEM:
-
Welcomed
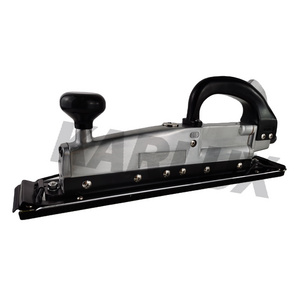
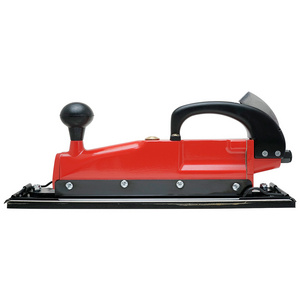
260W big power electric sheet sanders straight line sanders
Specifications
|
Rating |
230V~50Hz/120V~60Hz |
|
Sanding pad size |
90x187mm |
|
Sanding movements |
13000opm |
|
Sanding orbit diameter |
Φ2mm |
|
Paper mounting |
Velcro or clamp |
|
Dust collection |
Though the pad dust extraction system |
Features of sheet sanders:
1.Dust-sealed On/Off switch
2.Soft grip handle for comfortable extended use
3.Resin base
4.Lock-on switch

Assembly and Operating-sheet sanders
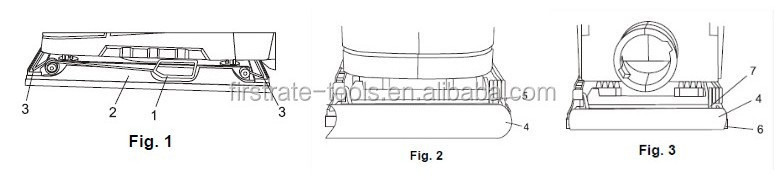
Installing sandpaper
1.Lift upward and outward on the sandpaper clamp arms (1) located at each side of the sander base (2) (Fig. 1). This will release the sandpaper clamps (3) that are located at the front and rear of the sander base.
2.Insert one end of the 1/3 sheet sandpaper (4) with its grit side up into the open front sandpaper clamp (5), making sure it is aligned with the backing pad (Fig. 2). Lift the sandpaper clamp arm upward and inward to lock the sandpaper into the clamp.
3.Wrap the sandpaper sheet (4) over the backing pad (6) and insert it into the open rear sandpaper clamp (7) (Fig. 3).
4.Lift the sandpaper clamp arm up and inward to lock the sandpaper into the clamp.
Punching holes in sandpaper
When new sandpaper is installed on the sander, place the corner of the sander base into the sandpaper hole punch with the base plate corner (1) nested into the corner of the hole punch (2). Press the base plate firmly into the hole punch. The sharp pins (3) will pierce the sandpaper (4) to allow it to extract the sanding dust.
ON/OFF trigger switch
To turn the sander ON, squeeze the trigger switch (1) Fig. (5). To turn the sander OFF, release the trigger switch.
Lock-on button
Your sheet sanders is equipped with a lock-on feature, which is convenient when continuously sanding for extended periods of time is required (Fig. 6). To lock the switch ON, depress the trigger switch (1), push in and hold the lock-on button (2) located at the left side of the handle, then release the trigger. Release the lock-on button and your sander will continue running. To turn the sander OFF, depress and release the trigger switch to release the lock-on button.

Sandpaper selection
Selecting the correct grit and type of sandpaper is extremely important in achieving a high quality sanded finish. Aluminum oxide, silicon carbide and other synthetic abrasives are best for power sanding. Natural abrasives such as flint and garnet are too soft for economical use in power sanding.
In general, coarse grit will remove most material. Fine grit will produce the best finish in all sanding operations. The condition of the surface to be sanded will determine which grit will do the best job.
If the surface is rough, start with a coarse grit and sand until the surface is uniform. Medium grit may then be used to remove scratches left by the coarser grit. Fine grit should be used for finishing the surface. Always continue sanding with each grit until the surface is uniform.
S anding
Clamp or otherwise secure your workpiece to prevent it from moving under the sander while being sanded. Secure the workpiece in a vice if possible.
Place the sander on the workpiece so the complete sanding pad surface is in contact with the workpiece. Turn the sander ON by squeezing the trigger switch. Move the sander slowly over the workpiece making successive passes in parallel lines. When sanding wood, make sure you move the sander parallel to the grain and not across the grain. This will make finish sanding more efficient and smoother.
Upon completion of the sanding operation, turn sander OFF by squeezing and releasing the switch trigger. Wait until the sanding disc comes to a complete stop before removing it from the workpiece.
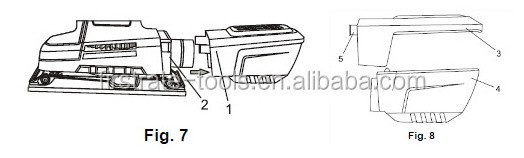
Cleaning the dust box
The dust box will collect much of the sanding dust that is generated during sanding operations. As a result, it must be cleaned out periodically so the dust collection will be efficient.
1.Squeeze the sides of the dust box (1) and pull it away from the rear of the sander (2) (Fig. 7).
2.Pry the top of the dust box (3) away from the bottom of the dust box (4) (Fig. 8).
3. Shake all the dust out of the dust box.
4. Use a soft DRY brush to remove the dust from the filter located inside the top of the dust box.
5. Once all the sanding dust is removed form the dust box, press the upper and lower sections together. They will “snap” into place when properly assembled.
6. Reinstall the dust box onto the rear of the sander. NOTE: The locking tabs (5) will “snap” into place when the dust box is fully pushed onto the rear of the sander.
Packed in color box or Nylon bag